
How Much Set Should Your Hand Saw Have?
The question of how much set to add to a hand saw is a common one for new saw sharpeners. Tooth set is a critical component to the performance of a hand saw. But how do you know if your saw has the proper amount of set?
Plenty of ink has been spilled about hand saw sharpening in the last decade. There are tons of guides on selecting the proper sized tapered saw sharpening files, what rake and fleam angles that different saws should have, how to joint the toothline so that it’s nice and straight, or properly breasted, and how to file the teeth to joint. But when it comes to adding set to the teeth, there isn’t a lot of guidance. Most saw sharpening instruction will simply tell you to set your plier type saw set to the number of points per inch of your specific saw and squeeze it over each tooth.
Unfortunately this isn’t really the entire story. There’s actually quite a lot more involved in adding the proper amount of set to a saw than just the PPI of the blade. What about the type of saw? Is it a crosscut saw or a rip saw? Is it a long hand saw for breaking down stock, or a short joinery saw? What type of wood will the saw primarily be used in? Will it be hardwoods or softwoods? Is the wood green or kiln dried? All of these factors play a role in choosing the proper amount of set.
Before we start to try and understand how to set our saws properly though, let’s take a minute to talk about the tools of the trade. There are multiple ways of setting the teeth on a hand saw, ranging from simple and difficult to master, to complex and almost foolproof. I’ve tried them all – hammer setting, saw wrests, and plier type sets, both new and old. In my opinion, the best tooth setting tool for the DIY hand saw sharpener is the plier type tooth set. These tools provide the most consistent amount of tooth set with the least amount of practice. However, the plier type tooth set does not automatically apply the correct amount of set to the teeth. You still need to adjust the settings on the tool to be appropriate for the specific saw.

Not all plier type saw sets are created equal, either. I’ve used quite a number of them and some are definitely more intuitive than others. In addition, some sets have only a single adjustment – the number of points per inch. These tools assume that every saw with a certain number of points per inch should have the same amount of bend put into the teeth, regardless of the other factors that I mentioned above. The better quality tools, however, will have two adjustments – one for the number of points per inch and one for the amount of bend that the tool applies. These types of sets are the ones that I recommend you seek out. They are by far the better tools.
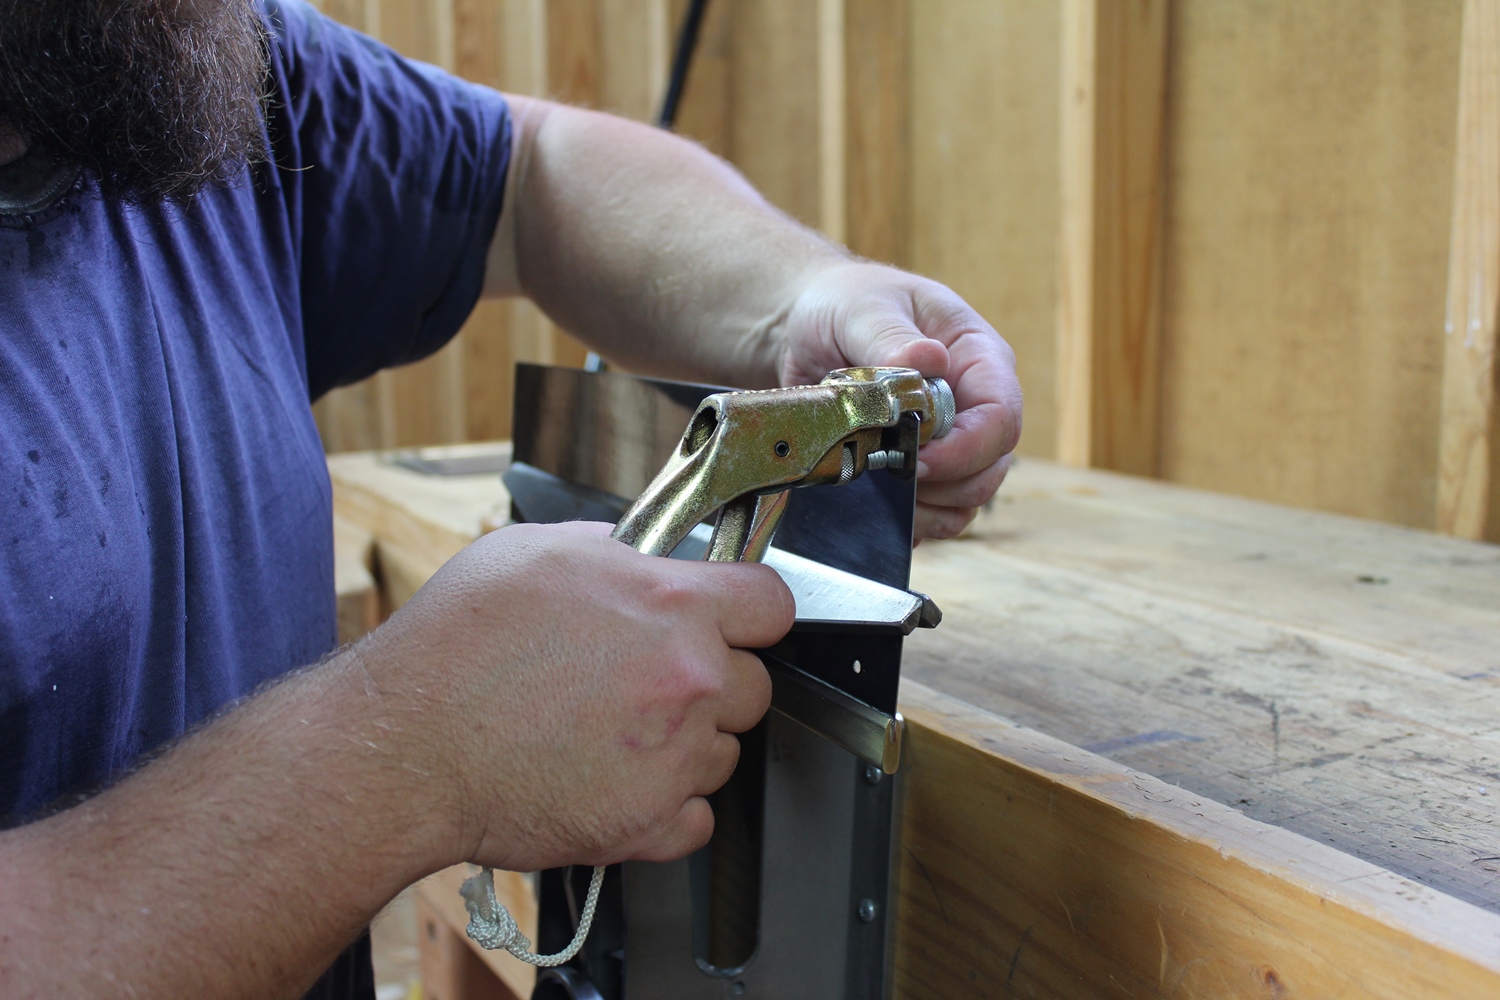
The first adjustment, the number of points per inch, typically adjusts the position of the anvil up or down along the blade so that the tooth is bent at approximately the center of its height, or just a little less. Bending the tooth more than half way down runs the risk of breaking the tooth, so this is an important adjustment. Some saw sets will only work with a limited range of tooth sizes, so the manufacturer might make a couple of different models (e.g. a large and a small) for different size ranges of teeth. Others, like mine (a clone of the Stanley 42W), will work for a much wider range of tooth sizes. This has to do with the size of the “hammer” that bends the teeth, and the adjustment range of the anvil. If you try to use a set meant for large teeth on a smaller saw, the hammer will be too big for the small teeth and the anvil won’t be able to put the bend in the correct spot on the tooth. If you try to use a set meant for small teeth on a large saw, the anvil may not be able to be adjusted far enough down the height of the teeth and you may not be able to put sufficient set into the teeth as a result.

While the first adjustment sets the position of the bend on the tooth, if your set has a second adjustment, like mine does, it is used to adjust the amount of bend put into the teeth. This adjustment, in my opinion, is the more critical one, and the one that the lower quality saw sets tend to lack. On my model, turning the knurled wheel on the bottom of the jaws moves the domed plunger in and out. This changes the angle of the blade in relation to the anvil and therefore changes the angle of the resulting bend that is put into the teeth. Moving the plunger out results in more set while moving the plunger in applies less set.
Having both of these adjustments allows me to tailor the set of a saw to a specific situation if need be. For example, a crosscut saw typically needs less set than a rip saw (because the kerf in a rip cut can tend to close and pinch the blade during the cut, while crosscut kerfs typically do not do this). So I can use this adjustment to put a bit more set in a 10 PPI rip saw than I would in a 10 PPI crosscut saw. Similarly, saws used primarily for softwoods benefit from a little more set than saws used primarily for hardwoods. The second adjustment of my set allows me to easily achieve this.
In terms of evaluating whether or not your hand saw has the proper set, there have been a lot of methods over the years that have attempted to quantify this. You can measure the thickness of your saw blade and then measure the amount of set in the teeth using a micrometer. However, this level of detail is really not necessary, and, furthermore, actually quite unreliable. As mentioned above, there are simply too many factors that play into how much set a saw should have. So just saying that a dovetail saw should have 3 thousandths of an inch of set on each side of the blade really doesn’t cover all of those situations (I just made this number up so don’t go quoting me on it).
The most reliable method for evaluating set is simply testing the saw and seeing how it feels in the cut. A properly set saw should cut through the board easily with no binding, but with no more space in the kerf than is necessary to prevent the saw from binding. If the kerf is loose, the cut will have a tendency to drift inconsistently.
When I sharpen a saw, I add the least amount of set that I think I can get away with for a particular saw. Then I test the saw in the woods most likely to be used. If the saw binds at all in the test cuts, I add a touch more set. This process should continue until the saw feels just right in the cut.
If the saw is really sloppy in the test cuts, or it drifts inconsistently left and right, it probably has too much set. Unfortunately, there isn’t a real reliable way to “un-set” a saw that has had too much set put into the teeth. Clamping the teeth in a metal jawed vise can work to unbend them slightly, however, use caution doing this as bending teeth against the direction they are set risks breaking the points off. I prefer to lightly side joint the teeth (file their sides) to remove some of the set, however, this method also has it’s downsides as filing the sides of the teeth will thin the steel at the most fragile area (the point) and also risk breaking the points in use.
So it’s better to start with less set than you think you need and add more if necessary. And if you’re looking for a video that touches on evaluating set in a saw (too little, too much, and just right), you can watch my latest release below, or over on my YouTube channel.
Tag:Hand Saws, Sharpening

2 Comments
Where can i buy a reliable pair of saw set pliers?
My favorite is vintage/antique Stanley 42W. If you can’t find the 42W, the 42X is a popular model as well (I just prefer the 42W). Look for one in good shape on ebay. If you have to have new, you might be out of luck. Several woodworking retailers used to carry the Somax brand, but I don’t know if they are still available or not.