
Making Kitchen Cabinets – The Design
Note: Click here for all the posts in this build series.
A lot of folks have asked to see the kitchen that we’ve been building in the new cabin. I’ve hesitated because the kitchen is far from done, and may yet be in progress for some time. But as I’m beginning to work on another new cabinet, I thought maybe some folks would like to see the process that I’m using to build them.
Fair warning, these posts will have a good amount of machine work in them. While building plywood kitchen cabinets using only hand tools is absolutely possible, it’s not something I find enjoyable. In fact, the whole reason that I have any machines at all is because of this kitchen build. So I make no apologies for the minimal use of hand tools in the next few posts.

We’ve been living in the cabin and using this kitchen as is for just over a year now. I just refinished the countertops (hence the green tape on the cooktop and sink) because the original finish that I used wasn’t protective enough and the counters had several stains that I needed to scrape and sand out. The island cabinets and wet wall base cabinets are all complete, except for sanding and painting the doors and drawer fronts. But it’s 42 degrees in my shop right now, so painting will have to wait until I can heat the space.

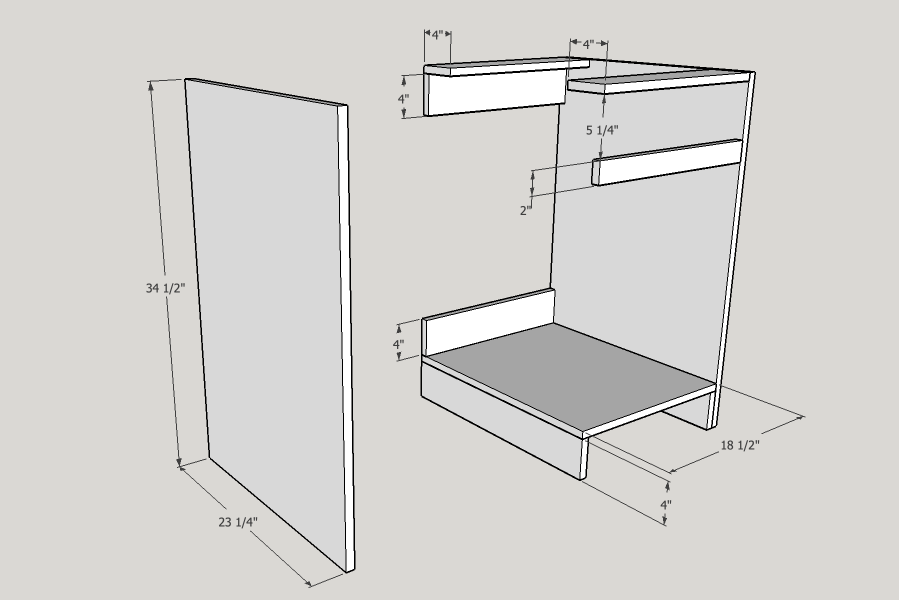
So, I’m moving on to the refrigerator wall base cabinets. This wall will have a small base and wall cabinet to the left of the refrigerator, a cabinet above the refrigerator, and a floor to ceiling pantry to the right of the refrigerator. For now though, I’m going to focus only on the small base cabinet to the left of the refrigerator. The process that I’ll talk about is what I used to build all of the base cabinets in the kitchen so far.

We’re planning to store some small kitchen appliances in this cabinet on a pull out tray, so the cabinet will be fairly simple. It will have one door and one drawer. We really like the look of older style kitchen cabinets without toe kick spaces, so that’s the way that these are being built. There will be a small shoe molding around the base, not because I don’t want to scribe them to the floor, but because we like the look better.

These are face frame cabinets with inset doors and drawers – probably the most persnickety style kitchen cabinet to make. If you don’t believe me, go price them out at your local source for kitchen cabinets. Believe me, there’s a reason that the cabinets sold at most major suppliers are frameless with full overlay doors. It’s not just because they’re a cleaner, more contemporary design.
My first task is to build the plywood box. This is the easy part. For the most part, there’s no joinery. The entire box is assembled with glue and screws. That makes the measurements for the box really straight forward because there’s no extra lengths for joinery that need to be accounted for. So with my cut list in hand, it’s time to take some sheets of plywood over to the table saw and cut out the parts. However, since I’ve spent so many years making furniture using only hand tools, I have carried some of my relative dimensioning habits over to the use of my machines.
More on that next time.

2 Comments
No apologies for using power tools necessary. When I made our kitchen cabinets I even bought a dovetail jig for the drawers because I needed a kitchen done and done as quickly as possible. The jig has not been used since. Instead of hand-cutting dovetails you have more time for building face frames and fitting doors.
I understand why you didn’t back your cabinets, but when I made ours I wanted backs because inevitably every fall a mouse gets in the house. By putting backs on the cabinets they have no way in and having them run across the countertop is much easier for trapping them.
Yeah, that’s a good reason for adding backs. I’m happy to say that we haven’t had any mouse problems other than in the garage/basement before I put the garage doors on (though we did have a bat problem right before we moved in). We’re sealed up pretty tightly now (except for some flies and lady bugs, but I’ll address that in the spring), so no more bats or mice inside the cabin.
I do plan on putting backs in the upper cabinets though, at least that’s the thought right now. I may change my mind when I actually get started on them, we’ll see. Believe it or not, I did hand cut all the dovetails for the kitchen drawers. It was actually only a one day job for me, and I like hand cutting dovetails, so that didn’t bother me. But I used a cope and stick bit for the cabinet doors. Go figure.