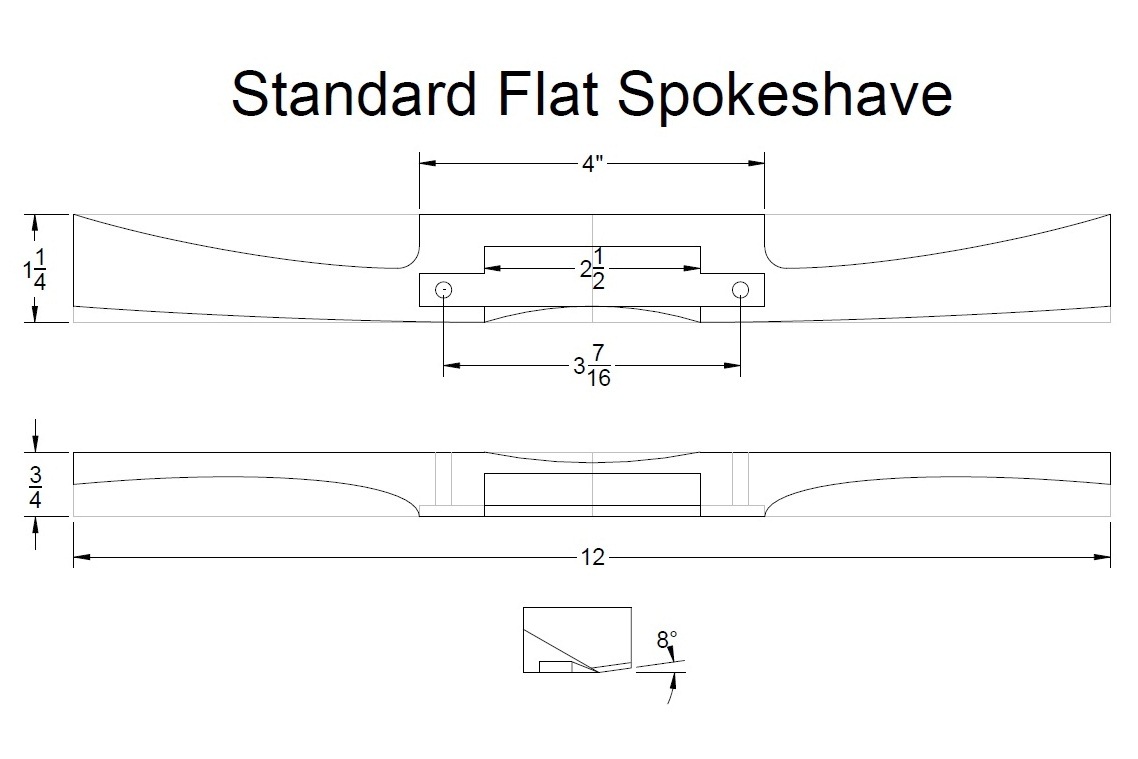
Plans for Building a Wooden Spokeshave

Several years ago I made a two part video series on making a traditionally styled wooden spokeshave. Those two videos continue to be two of the most popular videos on my YouTube channel (here’s Part 1 and Part 2). As a result, I often get asked where folks can find the plans to build one of their own. I had included a full scale drawing that could be used for templates on my old blog. However, as the old blog is no longer active, and much of the content has been migrated over to here, I thought that I should put the plans and details here as well.
I used a pretty piece of hard maple to build my shave, but just about any relatively dense hardwood will work. There’s a brass wear plate attached at the front of the sole, so the wear characteristics of the wood are not that important. However, it will be helpful if your particular piece of wood is dense enough to be tapped for machine screw threads if you are going to build yours in the same way that I did. This isn’t critical, but it allows you to add a nice little feature for fine adjustment if your wood can hold the threads.
I ripped the blank for my shave out of a 5/4 flatsawn board, so that the wide top and bottom surfaces were quarter sawn faces. This was mostly for appearance and because it was the stock that I had on hand. Turning the grain orientation the other way so that the flat sawn faces are on the top and bottom would be fine too (i.e. just sawing a blank out of a 3/4″ thick flat sawn board). This is a small tool with a small cross section. Therefore, the amount of wood movement is so small that it can more or less be ignored.

In terms of the blade, there are multiple options, but the blade you choose will impact the blade mounting steps, the mode of adjustment, and possibly the dimensions of your blank. So I suggest getting a blade ahead of time, before you cut your wood to size. Then you can compare the dimensions of your blade to the dimensions of mine in the drawing. I made my own blade, so it is highly unlikely that the dimensions of your blade will match mine exactly (plus I didn’t measure my blade super accurately). So you will have to make some minor adjustments to the pattern to fit your own blade.
Of course if you’re up for it, you could also make your own blade like I did. Then your blade could be made to match the dimensions of mine, or any dimensions you desire. However, I do not discuss that process in the video. It’s pretty straight forward (obtain 1/8″ thick O1 tool steel; cut out the shape of a spokeshave blade with a hacksaw & files; drill & tap holes for threaded rods; grind & harden blade), but if you choose to go that route, you will have to find another video that goes over the process of hardening and tempering the steel if you are not already comfortable with that step.
If you prefer to purchase a ready made blade, Hock Tools sells a blade that is similar in dimensions to my homemade blade (their larger blade), but it’s not exactly the same, so you’ll need to modify the plans to fit the blade. However, if you buy the Hock blade you will be able to follow the exact same construction process as I will be using, as the blade adjustment will work the same way.
Another blade option is the Lee Valley kit. The adjustment mechanism is different on this kit though, so you will likely have to alter the dimensions of your stock from what I’m using in order to use this kit. They have instructions available on their web site that you can download if you are using this blade.
Finally, here’s a full-sized PDF drawing of the above picture. If you print it out on legal sized paper it will be full-scale and you can use the drawing as a template for sawing and shaping later. If you print it out on letter sized paper, you’ll just have to tape the two halves together, or, just use a half pattern and flip it along its center axis to draw the pattern on the other half.

Tag:Spokeshaves, Tool Making
