
Wooden Plane Throat Geometry
I love a good wooden hand plane. The thick laminated iron, the feel of wood on wood, and the simplicity of having no moving parts has a special appeal that I just don’t get when I use an iron plane. I’m not saying that I dislike using my iron planes. I just like using the woodies more. And they’re just so darn pretty. It’s unfortunate [for me] that my current shop environment isn’t so wooden plane friendly.
But have you ever wondered why most old wooden planes found in the wild have mouths that you could drive a Stanley #8 through? This condition is typically attributed to wearing down of the sole from use and routine flattening. And while it’s true that routine maintenance of a wooden plane will open up the mouth, there’s a little more to the story than just routine maintenance and wear.
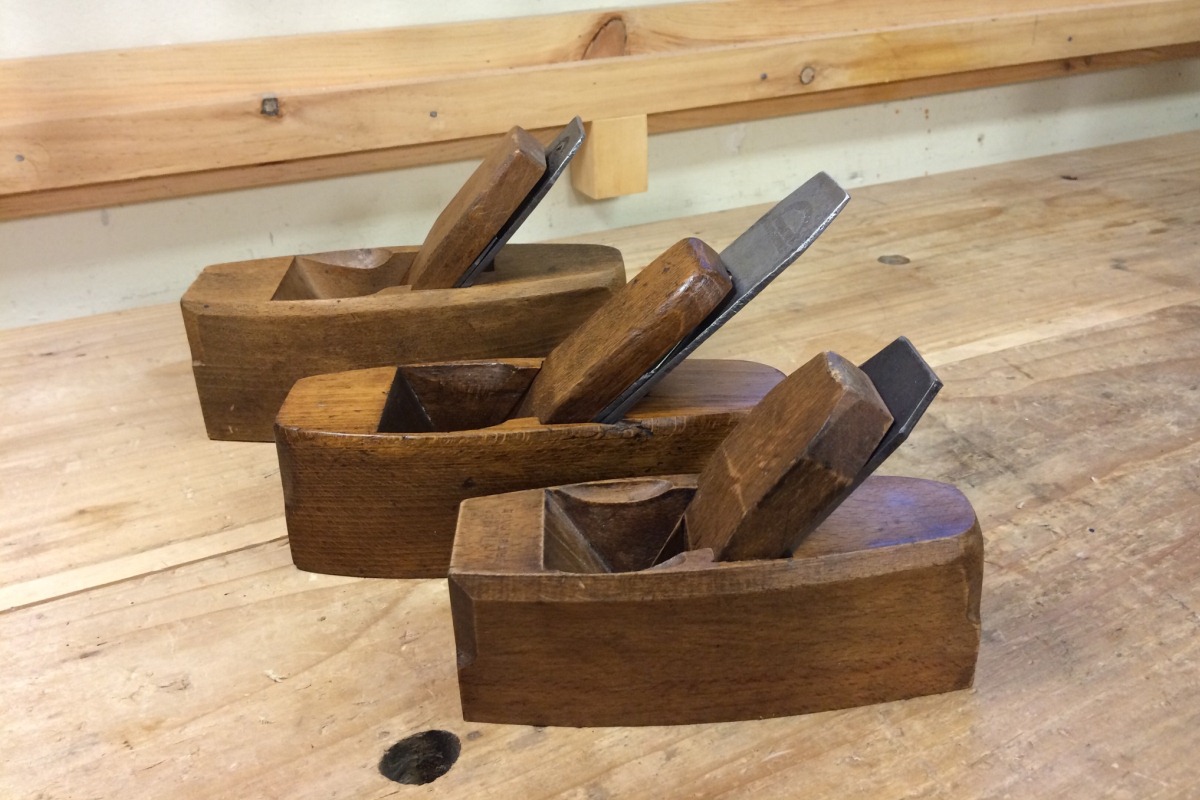
If we could look inside the throats of the three wooden coffin smoothers pictured above, perhaps we could shed some light on the mystery of wooden plane mouth openings. But I’m not about to take these planes to the bandsaw just to show you what their insides look like. To do so would be criminal (well, at least for the two English ones – the Sandusky was junk when I got it). Not to mention I sold them (the English ones) some time ago. So instead, lets cut them open with the aid of modern technology (a.k.a. Sketchup) and take a virtual look inside of these planes.
Pictured above is a drawing of a single iron wooden plane that has been cut in half (this is what the front plane in the photo above looks like inside). The bottom part of the throat, called the wear, is what we’re really interested in looking at here. This area of the throat angles over the iron for about an inch before angling back in the opposite direction to form the upper throat where the shavings can be removed. The closer the angle of the wear is to the bed angle, the less the mouth will open as material is removed from the sole during flattening. In an ideal situation the wear angle and bed angle would be the same, but the wedge adds about 10 degrees, and about another 5-10 degrees are needed to allow clearance for the shaving to escape, so obviously making the wear the same angle as the bed isn’t really possible.
In a single iron configuration, the wedge abutments can be sawn out with a small saw (like a flush cut saw) or an edge float. This has a great benefit for the planemaker as it makes the process of creating and fitting the wedge mortise much faster and more controllable. Because both sides of the wedge mortise (the bed side and the abutment side) exit the mouth of the plane, the saw and float can pass through the mouth and it is quick and easy to saw and float the sides of the wedge mortise to the proper fit. Also, because there is no chipbreaker, the front of the mouth can be closed up right to the edge of the iron, making for a plane with an extremely tight mouth.

Now let’s look at what the inside of the Sandusky (middle) plane pictured above looks like. This is what you will find inside of the typical, American factory made double iron plane. In most American factory made double iron planes, both sides of the wedge mortise were still typically sawn out to make the labor easier to perform by less skilled workers (typically prison inmates). However, the addition of the chipbreaker causes a couple of problems with this configuration.
First, notice how the presence of the chipbreaker impacts the mouth opening. In this drawing, if the mouth were closed up any more than it is, the chipbreaker would contact the wear. In fact, the mouth in this illustration is actually narrower than it should be because in the drawn configuration, there’s no room for the wedge tips to extend over top of the chipbreaker. So in actuality, the mouth opening in the drawing above should be even wider because some additional room needs to be opened up for the wedge. Also, keeping the wear angle around the 65-70 degrees, similar to the wear angle in a single iron plane, means that the mouth needs to be more open to prevent the chipbreaker from contacting the wear and preventing shavings from traveling up the throat.
For most of the American factory made planes, the double iron was apparently considered enough of an improvement that a tight mouth was not warranted and cheaper labor by less skilled workers prevailed. But there was a way to have ones cake (tight mouth) and eat it too (double iron), albeit with a bit of a compromise.

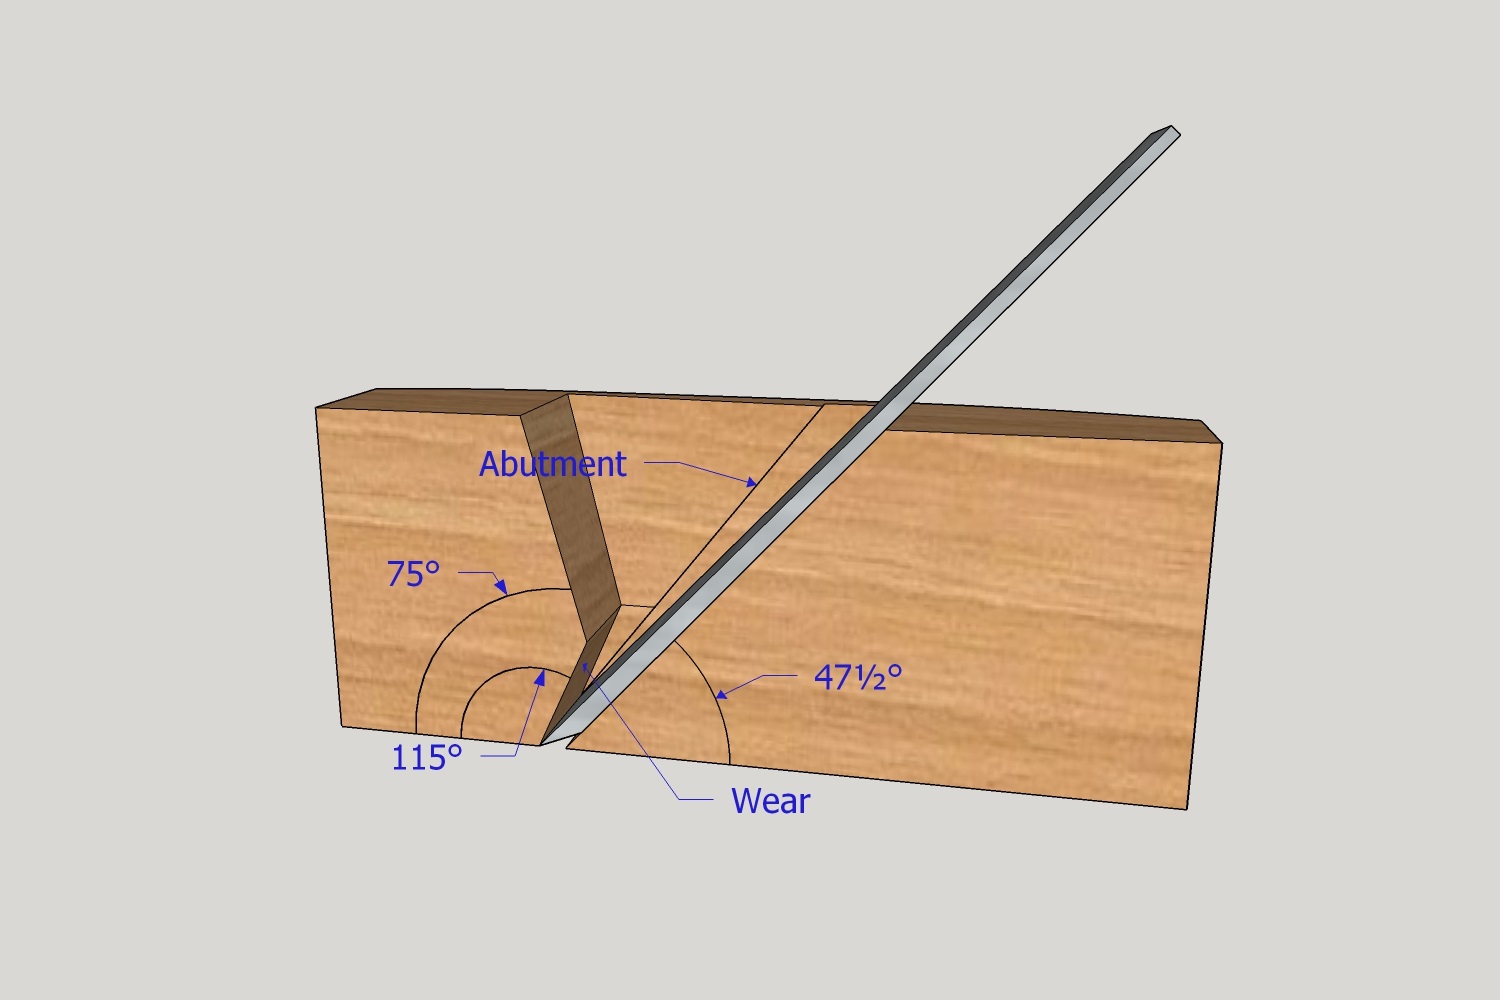
Before the American prison factories industrialized the production of the wooden hand plane by less skilled labor, English planes, made by very skilled planemakers, used a slightly different throat geometry to allow the use of a double iron while still providing for a tight mouth. The illustration above, which is the geometry of the rear plane in the photo at the top, shows the differences.
First, in order to address the issue of the wear hitting the chipbreaker, the makers increased the wear’s angle from about 65-70 degrees (typical for a single iron plane) to about 80 degrees. This steeper angle prevented the chipbreaker from contacting the wear, though it also resulted in the mouth opening faster with flattening of the sole (there’s always a catch). Second, in order to still allow room for the wedge to slide over top of the chipbreaker, the abutment was modified to end about half way up the wear rather than at the front of the mouth of the plane. These two modifications allowed for a double iron plane to be constructed with a tight mouth.
There was just one problem. The front of the wedge mortise (the abutment) could no longer be sawn through the mouth. Because of this, making planes with this geometry required a lot more precision work with chisels. Hence, as the 19th century progressed, and industrialization took hold, the “refinements” discussed above for the Sandusky plane became more common, and the quality, hand made planes of the previous generations slowly disappeared to be replaced by a cheaper, easier to make product.
Some would criticize wooden double iron planes because of the concessions made by the American factories. However, while the changes made by the American factories were likely implemented in order to allow a less expensive product to be made by less skilled workers, I’m not sure that having a double iron plane with a more open mouth is a huge disadvantage. At least one, very comprehensive, recent study has shown that proper use of the double iron more or less eliminates the need for the extremely tight mouth that was so necessary in single iron planes. With the chipbreaker properly tuned and set very close to the edge of the cutting iron, the shaving is broken before it has a chance to tear out. So, according to the study, using a properly set chipbreaker, one can even plane against the grain with little to no tearout, even with a plane that has no front sole at all. Of course this is in controlled laboratory conditions, but still, the study makes a very strong case for the double iron, and history has shown that the double iron was preferred after its introduction.
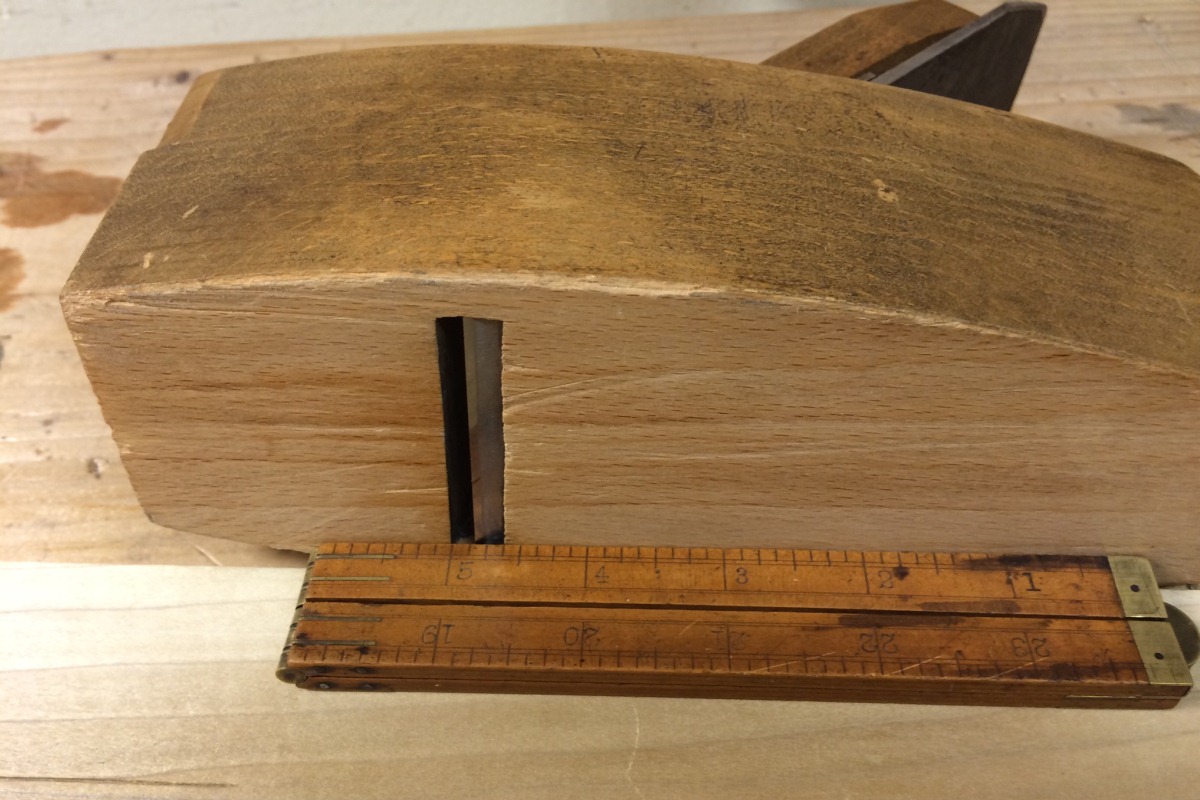
My experience using old wooden planes has more or less supported this finding. The plane pictured above is my old 8″ long smooth plane with 2 ¼” wide double iron bedded at 47 ½ degrees (the rear plane from the top photo). This plane was virtually unused when I bought it. Over the years I had flattened the sole a few times, and although very little of the wood on the sole had been removed since the plane was made, the mouth was still much wider than what most would consider acceptable for a smooth plane today. However, with the chipbreaker set properly, I never had any problems smoothing any of the woods that I typically use.
To me, this suggests that mouth opening on a double iron plane is less important than most people make it out to be, for the majority of situations. Sure, for some of the really squirrely grained boards that we occasionally run into, a really tight mouth might provide some additional benefit, but in all likelihood, so would stopping to sharpen the blade. For the typical work that most of us do, however, I just don’t think that mouth opening on a double iron plane is all that important.
Tag:Hand Planes

21 Comments
Thanks, Bob. Very informative post. (Now I’m going to go look more closely at my Clark and Williams abbutments).
This is a very interesting post Bob. Now I have to go home and check out my wooden planes to see what makes them different in construction. I’ve though of making my own planes and this kind of information will help out greatly.
thanks,
The coffin plane I bought recently has a 2 1/4 inch wide mouth and a 2 inch wide Sorby blade. It is a double iron plane and the wear angle is 100 degrees.Just checking the fit between the top of the chipbreaker iron and the bottom surface of the wedge (outside the plane body ) shows a slight wobble . I will need to sort that out . With the different widths the wedge tails have been stressed and don`t look too happy .I also noticed that the useful contact area of the wedge against the chipbreaker is a lot less than it would be with a single iron . So that makes me question whether those tail ends are any use apart from reducing the space for chips to clog it all up . I fitted the blade yesterday with a large 1/8th inch gap between the front edges . That could be better closed up . So assuming I should have a blade that fits the body width I tried a naughty experiment to close the gaps at the end of the wedge that will clog it up . The left side was left as it was and the right side was filled with a blob of Bluetack and carefully shaped to discourage shaving blockage .Wala ! For a short while the untouched left side began to clog, while the bluetack side was very happy . The tails must have been important originally but my main question is can they be bypassed and temporary /permanent mini wedges inserted to fill that space ? Maybe a dot of hot hide glue that could be tapped out if I wanted . I have also sent for a toothed blade (also 2 inches wide ) with no chipbreaker holes so a new wedge will be needed for that I would guess . But the plane will shave oak to a glassy smoothness already . So What happened to wooden plane designs when they changed to double irons ? Have they always made plane irons with a taper? Would a flat iron without any taper work also ? Bottom line —-Thankyou for explaining all this so well .
So it sounds like the blade was replaced at some point with the wrong size blade. I’m surprised it even holds its setting since not much of the blade can be inside of the wedge abutments if it’s a 1/4″ too narrow. Certainly the reason for the damage to the wedge tips as well. The minimal wedge contact is also likely because the blade was swapped. In most planes, the wedge would contact the entire surface of the chipbreaker until the point where the chipbreaker starts to curve down to meet the iron.
Often what happens with these older planes is that the wedge shrinks in relationship to the mortise and therefore no longer fills the mortise from side to side. This leaves room for shavings to get caught between the sides of the wedge mortise and the wedge tips, which doesn’t happen in a new plane with a well fit wedge. There are several ways you can fix this. You can glue shims to the sides of the wedge to make it wider, then reshape the tips of the wedge so that they fit properly and fill the wedge mortise fully. Another trick I learned from a friend I volunteered with at the museum was to steam the wedge tips and bend them slightly outward so that the press against the side walls of the mortise again. Finally, you can make a brand new wedge.
As for the toothing blade, you will definitely need to make a dedicated wedge for it. However, you may also find it challenging to use in this plane (and you may not so it’s worth a try). Most wooden toothing planes that I’ve seen have their blades set at a very high angle so that they are essentially scrapers. Their blade profiles are actually quite different from modern toothing blades you might get from someplace like Lie-Nielsen. Old toothing blades look like saw teeth and actually come to points. New toothing blades look like a row of small plane blades. In other words, the teeth don’t come to points, rather the blade just looks like a notched straight blade. This alters the cutting characteristics quite a bit. So I’m not sure how well a traditional toothed blade with teeth that come to points is going to work in a plane bedded at a 45 degree angle. I’d be interested to know how it works once you’ve had a chance to try it.
So what happened to wooden plane designs? The industrial revolution. Prior to the industrial revolution, all plane blades were tapered because that’s the easiest shape to make when forging. It would be much harder to forge a perfectly parallel iron. Parallel irons are the result of being able to roll the steel out to a consistent thickness and really don’t show up until the very late 1800s. Parallel irons will work in wooden double iron planes, but not quite as well as tapered irons. The taper helps to lock the blade in place because once the wedge is driven, the forces of planing serve only to lock things tighter. A parallel iron, on the other hand, can slip in a wedged plane if the fit between the bed, iron, chipbreaker, wedge and abutments isn’t perfect. Parallel irons in single iron wooden planes (without a chipbreaker) are even more finicky because without the slight taper that the chipbreaker adds to a double iron, there’s nothing to hold the iron in place in a single iron plane with parallel iron but the friction between the bed, iron and wedge. I’ve used single iron planes with parallel irons and they are not all that enjoyable to use when things are not perfect because the irons tend to slip.
Bob I just wrote a long post and my ethernet plug slipped loose and lost the lot . I had lost this site in my bookmarks already . I will try again later . I had some good stuff for you .
Let me try again.. The narrow blade and chipbreaker were fitted with the correct wedge . The tails were being twisted and compressed .
I can make this a bit shorter the second time round . I imagined a full width blade and a narrow chipbreaker would be better as the chipbreaker shape is not compatible with a straight edged wedge . That`s with a parrallel flat blade. A tapered blade has a simple clean angle compared to the curved top of a chipbreaker. The combination of flat blade and chipbreaker gives the impression of a wedge but the side slots would not accomodate the chipbreaker properly . I might be wrong but the arrangement seems very untidy mechanically.
The wooden tails with a parrallel flat blade are not functioning as genuine wedges near the blade tip .They are merely keeping control off the shavings so any stability has to come from much further back in the plane .
There is another site that describes advertising about “benefits”of parrallel blades and how they would prevent the mouth openeing wider as the tapered blade wears down . In practise it is shown that a hundred years of use would increase the opening by a mere 1/32nd of an inch . The rest would be due to the wooden sole wearing down . Even Sorby joined in the parrallel blade changeover .
I think I remembered it all from the previous attempt .
So I believe that the chipbreakers in a Japanese kanna are narrower than the iron as well, though this is for different reason as Japanese planes do not use a wedge.
But to your point, I’ve never had a double iron plane where wedge contact with the chipbreaker was an issue. I’ve had planes with the wrong wedge, or planes with replacement blades that would not bed well and needed rebedding. But after making the necessary adjustments, the blades always held fine and worked as well.
The wedge should be in full contact with the straight part of the chipbreaker, so there is plenty of contact in a properly fitting blade and wedge set. It just sounds to me like the blade that is in your plane is too narrow. The blade and chipbreaker should both fill the wedge mortise and be fully within the area of the wedge abutments. If there is any significant amount of space between the sides of the iron/chipbreaker and the sides of the plane body, then the iron is too narrow. There should be little to no side-to-side movement of the iron. It sounds like someone put the wrong size iron in that plane before you received it. Your original comment said the plane had a 2-1/4″ wide mouth and a 2″ wide iron. That tells me there’s too much room between the sides of the iron and the sides of the plane. Someone replaced the blade with one of the wrong size before you bought it. If you put a 2-1/4″ wide blade set in the plane, the problems you are having will likely go away, or at least be minimized (a properly sized iron set may reveal other problems).
Thanks Bob .I am still getting my head around the slightly mysterious geometry of it all .
So a chipbreaker plus a wedge should all sit inside those side grooves? I shall have a go at making a laminated one .
Hi Bob . Last week a shed sort out brought a very small wooden plane my way . A one and nine sixteenth inch blade width and a six inch long body in oak . Starting to get the hang of this game now . There is a simple blade and wedge in this one . I cleaned the rust off the blade and sharpened it .I straightened the edge angle sadly and discovered it was better crooked as the sole had worn down on the right side. There was a central groove in the sole which shows it was being used to chamfer edges mostly . The wedge rocked around on the blade so I straightened it up with sandpaper making sure to keep the tails off the paper . I rubbed the wedge sideways to deal with the central wobbly bit.The back end was kept intact by hanging the sandpaper off the edge of the bench. When it was flat against the blade I checked the clearance of the top inside the plane with a fine feeler gauge . Lumpy bits were smoothed out with a scraper. With the alterations I found the tails wanted to poke out the bottom .It needs a new wedge . A temporary bodge was to cut a strip of sandpaper and lay that gritty side upwards under the wedge
.So it works , but only with the blade sticking sideways as the sole and edge are at odds . I think a layer of wood glued to the sole would bring it back to normal . Then the mouth can be closed up nicely . I will look up the details of chipping the slot out . I bought a selection of old chisels last month . They will make a nice job of that .
I`ve got a baby plane now to make it a family .
I bought a 2 1/4 inch blade to replace the narrow 2 inch blade ..It`s very sharp now.The wedge fits well as far as I can tell .It judders when planing beech . Is there a best shape for the blade edge? It`s pretty straight across with a slight softening of the edges .Maybe a steady curve to keep the edges away from the surface would be better .The judder always happens on the right side .I use as fine an edge as I can manage .
Best shape to the blade? I like to every so slightly camber my smooth planes. Basically just easing the corners.
So the chatter you are experiencing is almost certainly the result of the replacement iron not being “matched” to the wooden body. This is to be expected any time you replace the iron in an old woody. When the plane maker first made the tool, the iron set, the plane body and the wedge were precisely fitted to one another. The benefit of this is that the iron will be a wonderful match to the plane and will bed very firmly and securely without any chatter. The drawback is that that iron set will only ever fit the plane it was originally fit to properly. That is unless you fit it to the new plane 🙂 .
The process isn’t hard, but it is going to take a bit of patience on your part. You essentially will need to make adjustments to the bed of the plane until you get really good contact between the blade and the bed of the plane. You can watch how to do this in an old YouTube video I did here: https://www.youtube.com/watch?v=ZTGOPyD6HSQ
Once you fix any issues with the bedding of the iron, you will likely need to make adjustments to the wedge, or make a new wedge. Then, everything should work without chattering.
Thankyou Bob. This so cool to have a resident expert available .
Well I was going to say …I bet they use a candle to make some soot on the blade…But I took that out .That fits in with sharpening the blade with a diamond plate as it still has a high spot on the back . There is a very seductive sound using a wooden plane .Thanks for the video .
Hello I am currently making a jack plane but I have not decided on wether it will be a single or double iron one.
Can you give me some advice?
The mortise for a double iron is a bit more challenging to make because the front of the wedge mortise can’t be sawn through the mouth like on a single iron plane. But in terms of performance both styles can be made to work perfectly. The wood being planed won’t know the difference. So my advice would be to choose the style you like better and build that one.
Thank you, going for a single iron then, I have a lot of them from my father.
Hello – I’m tuning up an old Alex Marshall double iron smoother. I don’t believe it had ever been used before. How tight should the double iron fit in the abutment? Should it drop through to the mouth unless the wedge is present? On this plane, I have to tap the iron several times without the w/out the wedge before the plane reaches the mouth.
Yes, it should only stay in place with the wedge. If it fits too tightly in the mortise, you may have to file the sides of the mortise to loosen it up slightly. It needs to be loose enough to allow some lateral adjustment of the iron but no looser. Your plane body has likely shrunken over time. But while the wood shrinks, the metal doesn’t, so the wood shrinks around the iron and it gets tight.
Bob, first thank you for your generosity in sharing your knowledge regarding hand tool woodworking. I’ve got a couple of vintage wooden planes (a jack and a try/jointer) that are in excellent shape but the double irons (which appear to be original) are extremely tight in the mortise (the wedge seems to fit just fine). Do you have any advice or can you point to a resource on how best to file the mortise sides and what tool(s) to use? Should I take care to only widen the part of the mortise sides that contacts the irons, while leaving untouched the part of the mortise side that contacts the wedge? And how much lateral iron movement should there be? Again, thank you. I look forward to taking your online hand plane essentials class when it’s available.
Hi Charles,
The cause of the iron being too tight is that the body of the plane has shrunk over the last 150+ years while the blade has not. This is always a tough situation to address as none of the fixes are ideal, and often times fixing one issue can create another.
The first thing that usually comes to mind is what you are suggesting – pare/file/float the wedge mortises wider to provide more room for the blade. The problem with doing this is that if you widen the mortise, then there will be space between the sides of the wedge mortise and the sides of the wedge. This space between the side of the wedge and mortise is probably the #1 cause of mouth clogs in wooden planes. The gap causes the tips of the wedge to catch shavings which are then guaranteed to get caught and pack up in that space between the wedge and side of the mortise.
So if your wedge fits well side to side now, I’d avoid altering the plane body at all. I’d grind the sides of the iron slightly instead. This of course creates its own issues because you will likely then have to grind the sides of the chip breaker as well. But you at least shouldn’t have to grind much because these old irons typically taper not only in thickness, but also in width. So the iron should already be narrower the further away from the cutting edge you go. You want to grind so that the iron can be freely inserted and removed from the plane and so that there is just a little room for lateral adjustment.
You don’t need much room for lateral adjustment if your iron isn’t ground at a skew. Check the squareness of the edge to the centerline of the blade, not to the side of the blade. Again, the blade tapers in width so the edge isn’t going to be square to the side of the blade. If you do grind it so that it is square to one side of the blade, it’s going to be really out of square to the other side of the blade and you may not be able to adjust it for an even cut. It should be out of square evenly on both sides if it is square to the blade’s center line.
If there’s already a space between the sides of the wedge and the sides of the mortise, then you may as well pare or file the sides of the wedge mortise a little as you’ll probably need to fix the wedge anyway because you probably already have issues with the mouth clogging. I usually use a chisel when I’m going to do this because a file is too slow and unless you use a safe edge file, you run the risk of altering the angle of the bed or wedge abutments. If you do that, then you may fix the issue with the iron binding, but it won’t be bedded well and the wedge won’t hold it well.
For some other tips on troubleshooting and tuning wooden planes, you can check out this post https://brfinewoodworking.com/troubleshooting-and-tuning-wooden-hand-planes/
Thank you Bob. Very helpful. It had not occurred to me to modify the iron rather than the plane. I’ll give that a shot. Thanks