

Making a Leather Dovetail Saw Case
To date, I have not been one to buy or make cases for my tools. When I lived in New Jersey, I hung most of my tools on custom holders on the walls. My shop in New Jersey was insulated, dry, and climate controlled. So I never had rust problems in my old shop. However, the same cannot be said for my new shop here in the Appalachians. My current shop is not insulated, climate controlled or dry. So anything not protected in a chest or cabinet tends to rust in a matter of hours.
To combat this problem, I recently completed a new, larger tool chest to house all of my hand tools and protect them from rust. However, I always struggle to find a decent place to secure small saws, like dovetail saws, in these large tool chests. They’re too small to fit in the saw till at the bottom, I don’t like storage on the inside of the lid, and since I have a tool rack on the front wall of my chest for chisels, gouges, rasps, etc., there really isn’t any room to mount my dovetail saw to the front wall of the chest. So I’ve decided to just store the saw in one of the sliding tills. However, I want to protect the teeth of the saw from other tools in the till, and protect those other tools from the saw’s teeth. I could just make a wooden tooth guard, but I wanted something a bit more elegant. I could have bought a leather case from Lie Nielsen, but that didn’t seem right since I made my dovetail saw. So instead, I decided to make my own leather case.
Basic leather work is actually not that difficult or expensive to do. I bought all of the tools and supplies that I needed to make this case at a Michael’s craft store, including a large bag of leather remnants. The cost was about the same as buying the LN dovetail saw case, but I have enough leather and other supplies to make lots of other leather items useful for woodworking tools and projects. So let’s make a dovetail saw case.

I’m working at my desk here because the natural light is much better here than it is in my shop. The plastic cutting board makes a good surface for cutting the leather. I use a utility knife with a brand new razor blade and straight edge (just a ruler) to cut the leather. The curved section around the saw handle was cut with a really sharp pair of scissors. Only two small pieces of leather are required. The small one will make the inside of the case. The larger piece will be the outside of the case and closure. You could just use a single piece of leather and fold it over, but the fold tends to be bulky. I think stitching two pieces together results in a flatter profile.

When you punch the holes for stitching the two pieces of leather together, you want them to be evenly spaced so the finished product looks nice and neat. There are special leather working tools designed for spacing out the stitches, but they’re not that cheap. So I used something I already had in the house to make evenly spaced marks to guide my leather punch.

After marking the stitch spacing with the fork, I punched the holes. I’ve used an awl to make the holes before, but the awl doesn’t actually remove any leather from the hole, it just pierces through. This makes pushing thick leather needles through a bit more difficult and doesn’t leave as much room for the heavy waxed thread that I like to use for stitching leather. So instead, I bought an actual leather punch for this. It’s not a fancy one (it’s the cheapest one I could find), and it does require using a mallet, but it works.

After punching the holes in the inside piece of leather, I used the fork to transfer the location of the stitches to the outside piece of leather. Then it was back to the mallet and punch to excavate more little leather plugs. OK, it wasn’t a mallet but a meat tenderizer from the kitchen. I was too lazy to go back out to the shop.
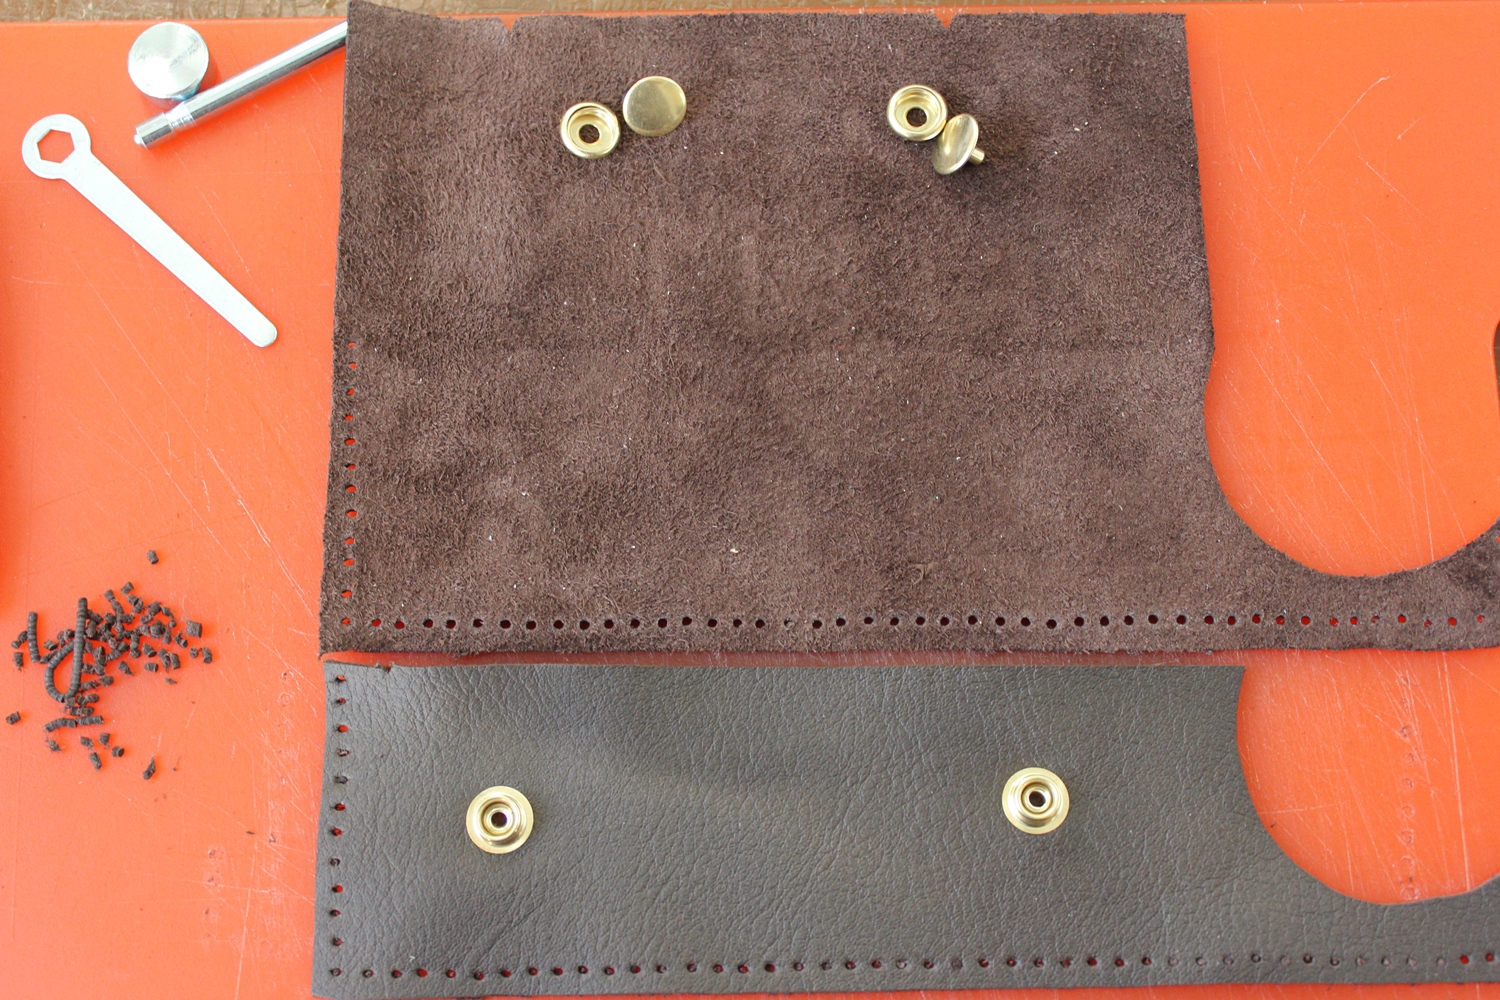
With the holes punched in both pieces of leather, they are ready to be stitched together. However, it is much easier to attach the male half of the snap closure to the inside piece of leather before the two pieces are stitched together. I marked the location of the two male snap closures and punched holes for the rivet posts. I had to use a slightly larger punch diameter from my punch set for the rivet posts. If you forget to add the closures before stitching, don’t worry, you can still do it after the pieces are stitched together. It’s just easier to do it now.

After riveting on the male half of the snap closures, I cut a piece of heavy, waxed nylon thread, about three times as long as the stitch length. The saddle stitch is the strongest stitch for sewing two pieces of leather together, so that’s what I used here. The saddle stitch requires two needles. They are passed through the same hole in opposite directions. This essentially gives you a double stitch. To complete the stitch, the direction of stitching is reversed and the needles passed back through the same holes for about a dozen or so reverse stitches. This avoids having to knot the thread at the last hole to keep it from unraveling and provides for a nice, clean, professional look.
Once the two pieces of leather are stitched together, the top flap can be trimmed to final length. The locations of the two female halves of the snap closures are then marked on the flap, the holes are punched, and the snap closures are riveted to the flap. If you want to cut a rounded or decorative corner on the flap, now would be the time to do so. I didn’t bother, but I can always cut it later.

The dovetail saw case took me about an hour and a half to make but was a really fun little project. It’s not the prettiest work, but it does its job as intended, and still looks nicer than one of those plastic saw edge protectors. And while I could have just bought a case, this one is perfectly sized to my saw, just like my card scraper wallet is perfectly customized to my set of card scrapers.


4 Comments
Look out Kari Hultman…
Nice job Bob.
Ha! I don’t think Kari has anything to worry about, but thanks!
About the moisture problem. Unfired clay has a very useful property in the way it can affect air humidity . If you have a large tool box and some space to fit moveable layers of clay behind a grill for instance you could play with the idea of placing very dry clay in the box which will absorb air moisture. It settles out at 50/50 humidity which is ideal for eg string instuments . Just keep drying one layer on a radiator and swopping them over . The main cause of rust is warm air meeting cold tools .But the clay idea could create a market in musical circles for all the players who get instruments either too dry or too damp . It`s a continuous headache for musicians with ultra expensive instruments
That’s a really neat idea. Heck, I could dig it up in my yard. I’ve heard unslaked lime does the same thing. A bit more caustic than clay though 🙂 .