
Making a Tenon Saw – Part 4
Note: You can find previous installments of this series by clicking here, Introduction, Part 1, Part 2, Part 3.
At the end of the last post in this series, we were at a point where pretty much all of the difficult, finicky work was behind us. Now we come to the part of the process where we get to relax a little – the shaping of the handle and the final assembly. This part intimidates a lot of people because of all of the glamour shots of pretty saws that you can find on the interwebs. But shaping need not be intimidating. It has no bearing on the final function of the saw other than user comfort. If you’re building the saw for yourself, user comfort is pretty easy to accomplish because you can continuously check the feel of things as you progress.

But before we start shaping the handle, now is the best time to mark and drill the saw blade for the mounting hardware. The easiest way I’ve found to do this and ensure everything lines up well is to complete the full process for each mounting hole separately. I place the handle onto the dry assembled saw and get everything in position just where I want it. Using a spring loaded center punch, I mark the hole for the first bolt by lining up the punch through the handle hole. Then remove the handle and back, and drill the first hole. I use a carbide drill bit sized for the saw bolts I’m using. These bits are not cheap, but they make easy work of drilling the spring steel. Regular HSS drill bits will do it, but expect them to dull very quickly. I can usually only get two or three holes out of a HSS bit before it’s too dull to cut the spring steel.

Once the first hole is drilled in the blade, reassemble the blade to the handle and install the first bolt. You may need to file a burr off of the back side of the first hole in order to get the handle on. Get everything lined up where you want it again, and use the center punch to mark the blade for the second hole. Then remove the handle and drill the second hole. By putting the first bolt in place, you can be sure things won’t slip around while you’re marking the second hole and you’re much more likely to get two holes that line up properly when you go to reassemble things later.

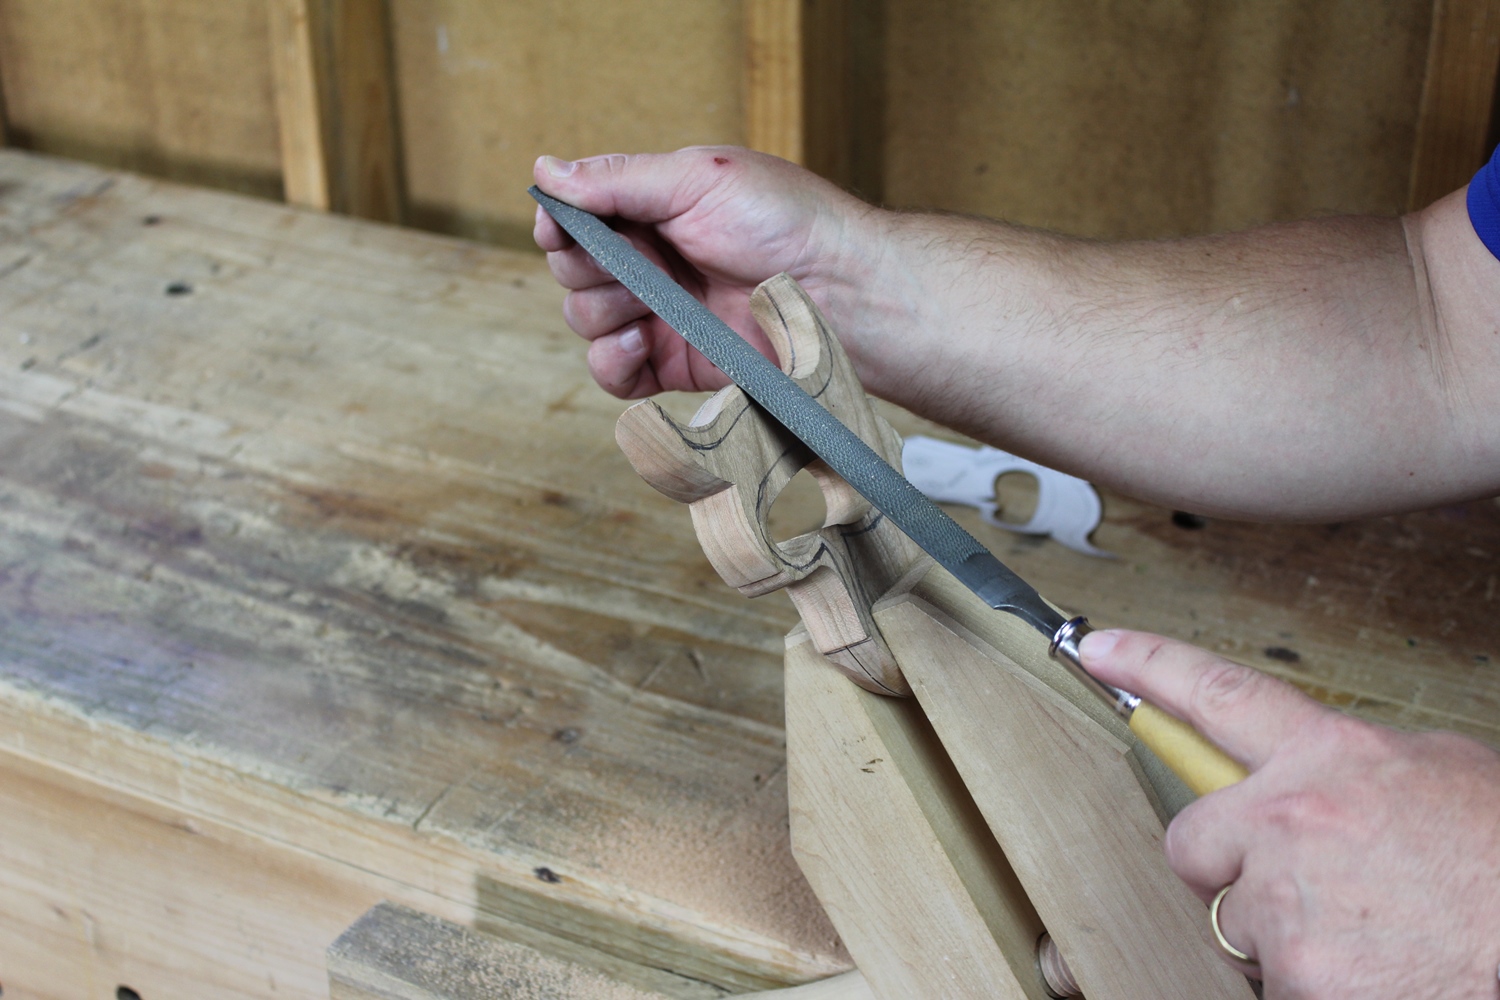
With the blade drilled, we can move on to shaping the handle. Using your pattern as a template, draw some lines on your handle blank to help guide you when you are shaping. You’ll want to draw these on both sides of the handle blank. Don’t worry about getting these lines perfect. They’re just guides to get you in the neighborhood of where you want to be. Ultimately your eye will tell you if things look right and your hand will tell you if things feel right. You should be stopping to check the feel of the handle frequently throughout the process.
I begin the shaping with my trusty No. 50 pattern makers rasp. I bought this rasp almost 20 years ago when they were still made in the USA. Sadly, I don’t believe the new ones are quite as well made as the old ones, so try to find a new-old-stock made in USA one if you plan to look for one. There are other options, such as the new hand made rasps being made by several companies. But they will cost you two to three times as much as the old Nicholson No. 50. As much as I’d like one of the new hand made rasps myself, I don’t use a rasp enough to justify the cost, and my No. 50 has always done everything I’ve asked of it just fine.
I shape from each side toward the middle of the handle. You’ll notice in photo above that I’ve drawn a line down the center of the end grain as well. This helps me keep things looking and feeling symmetrical. You can draw this line on the inside of the handle as well, but I didn’t bother.

To refine the shaping of the handle I rely primarily on a set of small scrapers that I made years ago. These are just small cutoffs of old saw projects that I shaped with a radius on one end. The thinnest ones are the most useful for getting into the tight curves and inside areas of a saw handle. They are real time savers for refining and smoothing the inside of the grip especially and save me a lot of sanding time by removing all of the tool marks before the sanding starts.
The other tool I use a lot on these handles is a bit more unconventional – tapered saw sharpening files. While these are not really meant for filing wood, I’ve found no better way of establishing, refining and smoothing the lamb’s tongue carving on the bottom of a closed grip saw handle. I’ve tried using carver’s parting tools (i.e. v-gouges) and regular bench chisels, but the triangular tapered saw sharpening files just seem to get the job done and, at least in my hands, they do it better than other methods.
I continue to rasp, scrape and file until the handle feels right in the hand, and until I’m happy with how it looks overall. I make sure to stop and check the feel and look frequently during the process because if I go too far and make an area too thin, I can’t put wood back on. Once I’m happy with the overall look and feel of the handle, it’s ready to apply the finish.
I start the finishing process by sanding all of the shaped edges with 220 grit paper, followed by 320 grit paper. I don’t bother sanding the wide, flat sides of the handle. Instead, after the sanding to 320 grit is finished, I lightly smooth plane both faces to put the crisp lines back into the handle. Then I wipe on a coat of finish. I like Minwax Antique Oil Finish for this. It’s a linseed oil based alkyd resin varnish that dries very hard and is capable of being rubbed out really smooth later.
After letting the first coat of finish dry overnight, I sand the handle lightly with 400 grit paper, and wipe on a second coat. Once dry, that coat is sanded back with 600 grit paper and then I wipe on a third and final coat.

While the finish on the handle is drying, I turn my attention back to the saw blade. With everything drilled, the blade is ready for final assembly. I like 30 minute epoxy for this. Most hardware stores only carry 5 minute epoxy, but it’s worth searching out the 30 minute variety (my local Tractor Supply carries it). The 5 minute stuff will work, but it requires you to move very quickly to get it mixed, get it applied, get things assembled, and get the excess cleaned up before it sets. By using the 30 minute variety, I have plenty of time to get everything set just right, make any adjustments that need to be made, and clean up the excess. I use acetone on a rag to remove the excess epoxy from the blade and back and create a nice clean joint.

After the epoxy has cured overnight, I finish up the polishing of the blade and back. I usually don’t bother to use any kind of sandpaper on the blades because it really isn’t necessary for the function of the saw. For my own saws, I just clean and smooth with metal polish. However, if you don’t use sandpaper at all, the blade will have kind of a dark bluish polish to it. In this case, since I’m selling this saw, I decided to go ahead and brighten up the blade a bit. So I lightly sanded the blade and back with 600 grit, 800 grit, and 1500 grit papers before finishing up with metal polish applied with 0000 steel wool and buffed off. The saw still has smudges and finger prints on it, but that will be taken care of later after the teeth are cut in and sharpened.

The last thing I do before moving on to cutting in the teeth is to address the fit of the saw bolts. At this point, it is very likely that the heads of the bolts and the split nuts do not sit flush with the sides of the handle and the threads of the screws likely protrude through the split nuts too far. To make the heads of the bolts and the split nuts sit flush, I use the 1/2″ Forstner bit and adjust the counter bores. I do this by just using the bit with my hand in order to go very slowly and only remove the tiniest bit of wood at a time. You really don’t want to go too far here as it doesn’t look good. I aim for the head of the bolts and the split nuts to sit just a half of a hair below the surface when they are tightened. This way if the handle shrinks a little, they won’t sit proud of the surface, and you get a nice tiny little shadow line that I think highlights the bolts.
After the heads of the bolts and the split nuts are sitting properly, I use a permanent marker to color the exposed threads of the bolt. Then I take the bolts out and file the threads down until they no longer protrude. Again, my goal is for the threads to sit slightly recessed below the surface of the split nut to provide additional shadow lines. I just think it looks better this way.

Once the threads were filed to the proper length, I polished the surface of the bolt heads and the split nuts up through 1500 grit. Finally, before final assembly, I rubbed out the handle with 0000 steel wool and paste wax to give it a super smooth feel that is very comfortable to hold. The finish is just thick enough to protect the handle, make it look pretty and keep it from getting really grimy from sweaty hands, but thin enough so that it’s not slippery like a thick film finish would be.
This one is ready for some teeth, then it can be delivered to its new owner.

1 Comment
HI Rob,
Again: Excellent commentary on making a handsaw. Easy to follow instructions and a GREAT looking saw. (as usual-smile)
Dynamite P. would be proud.
Regards,
Bill B.