
Sharpening Auger Bits
Note: I have several articles on sharpening different types of bits for a hand brace. While I cover sharpening auger bits in this article, I also have articles on sharpening center bits and gimlet bits as well.
Spiral auger bits for use in a hand brace were developed in the mid-19th century (large T-handle spiral augers for timber framing and ship building were an earlier invention). The Cook’s pattern auger was patented in 1851, followed shortly thereafter by the patent for the Jennings pattern auger, in 1855. Interestingly, while Cook patented his design several years earlier, it was the Jennings pattern that dominated the market in the following years.
Auger bits had several advantages over center bits and shell bits, so it comes as no surprise that auger bits came to replace the older style bits. Auger bits were capable of being made in fairly small sizes (down to about 3/16″) without becoming thin and fragile like shell bits. Like center bits, they scored the perimeter of the hole cleanly, preventing chipping around the perimeter of the hole on entrance of the cutting lip. However, unlike center bits, spiral augers could be used to accurately bore deep holes as a result of their long spiral shape, which efficiently cleared chips from deep holes and kept the bit running straight. In addition, the lead screw of the bit pulled it through the work, requiring less pressure on the pad of the brace by the user, and allowing for straighter boring.
As a result of their design improvements, spiral auger bits soon replaced other bits designed for use in a brace and became the most popular style of bit used. Therefore, spiral auger bits are the most commonly found bit in hand tool kits today. I’m going to be sharpening a Jennings pattern auger bit in this article. The same process would be used for sharpening an Irwin pattern spiral auger. Cook’s pattern bits are sharpened a bit differently since there are technically no spurs, only curved cutting lips. However, Cook’s pattern bits are quite rare, and since most people will be using Jennings or Irwin pattern bits in their work, I won’t be discussing sharpening of the Cook’s pattern bits here.
The process for sharpening spiral auger bits is quite similar to the process for sharpening center bits, which was discussed in a previous article. Like the center bits, when sharpening spiral auger bits we have to deal with the spurs on the outside of the bit that score the perimeter of the hole cleanly, the cutting lips which actually remove the chips from the hole, and the center point. Compared to center bits, which have only a single scoring spur and a single cutting lip, spiral auger bits typically have two scoring spurs and two cutting lips that have to be dealt with.
The added complexity of the spiral auger bit is that its center point is a threaded lead screw compared to the smooth pyramidal point of the center bit. The lead screw of the spiral auger bit can be a blessing or a curse. While the lead screw can help to pull the bit through the cut, many problems associated with using old spiral auger bits can be attributed to an issue with the lead screw. So the lead screw is a good place to start when dealing with these old bits.

A spiral auger bit self feeds via the lead screw. There are coarse pitched lead screws for soft woods and fine pitched lead screws for hard woods. If the bit is properly sharpened and the lead screw is functioning properly (and isn’t too coarsely or finely threaded for the wood being bored), the bit should require no downward pressure at all to progress through the cut once the lead screw is engaged. In fact, putting more downward pressure on the brace will not make the bit cut any faster. Only turning the brace faster will make the bit cut faster. The most frequently observed problem with the lead screw is that it will clog with dust or chips and stop the screw from pulling the bit through the wood. The usual reason for this occurrence is damage to the threads of the screw.

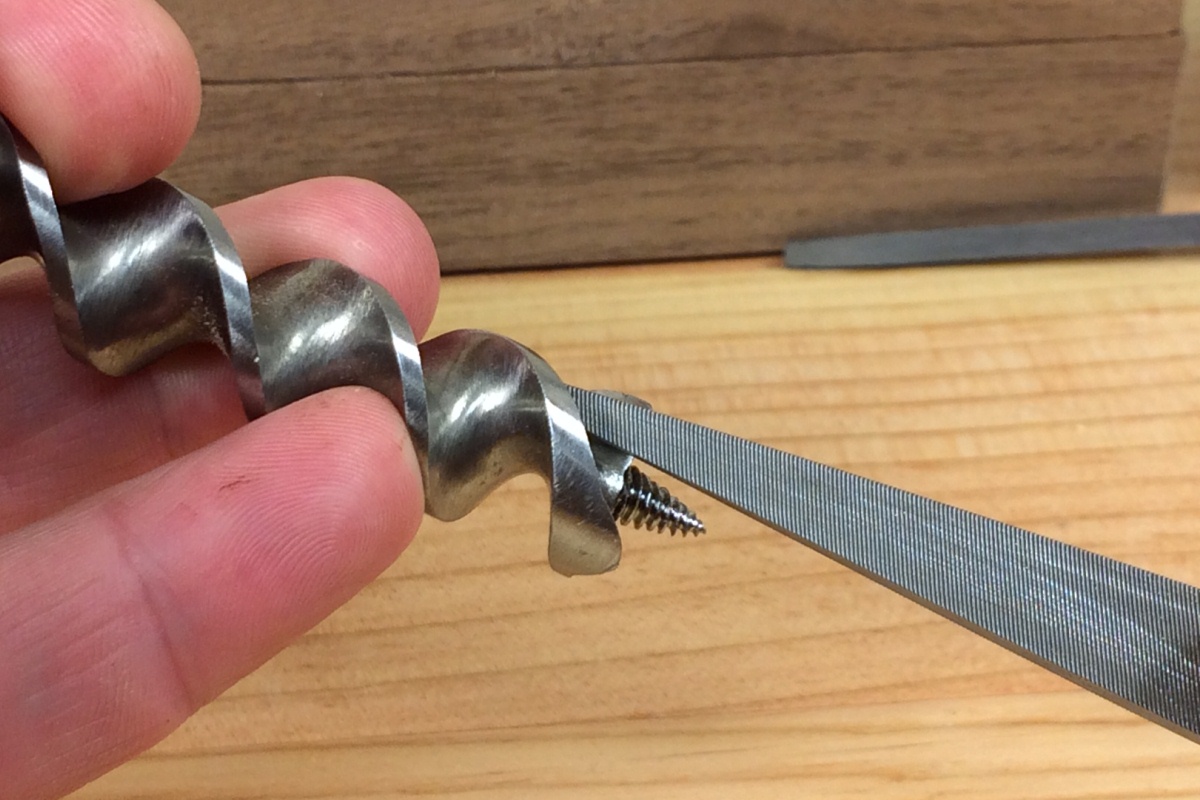
If the threads aren’t completely gone beyond repair, some light filing with a very small triangular saw file or a triangular needle file can smooth out any burrs in the threads and help the lead screw to self-feed once again. As an added benefit, once any serious damage to the threads has been filed away, some polishing of the threads will help to avoid future clogging and let the screw slide right through the hole.

A super simple way to polish the threads of the lead screw is to put something abrasive into a partially started lead screw hole and run the lead screw up and down through the abrasive material several times until the threads are clean and polished. I’m using some green chromium oxide honing compound forced down into the hole, but loose abrasive lapping powder, diamond paste, and automotive valve grinding paste are other great options for accomplishing the same thing.

Once the lead screw has been addressed, the next things to tackle are the scoring spurs. These rounded spurs serve to score the outer perimeter of the hole before the cutting lips make contact with the wood. The spurs need to be very sharp in order to bore a clean hole, but more importantly, they need to be sharpened correctly. Using a small saw sharpening file, or an auger bit file designed specifically for the task, the spurs should only be sharpened on their inside edges. Wiping the burr off the outside with a very fine honing stone or sandpaper is OK, but you should NEVER file the outside of the spurs. Filing the outside edge will change the diameter of the hole that the bit cuts, making it smaller than the flutes above. This will cause the bit to jam in the hole as soon as the bit gets past the cutting spurs. Once this is done, there really is no way to correct the problem without grinding down the entire bit to a consistent diameter.
Once the lead screw and scoring spurs are addressed, the bit should function decently. The bottom of the hole may not be very cleanly cut, but the cutting lips should pull up the chips, even if they are dull. To sharpen the cutting lips themselves, and make the bit cut a little bit better, file only their top edges (as viewed when using the bit) with a small saw sharpening file or an auger bit file. Again, you can wipe the burr off of the bottom side of the cutting lips if you like with a single file stroke or two, but try not to remove any significant amount of metal from the bottom of the cutting lips.

On the other hand, if after addressing the lead screw and scoring lips you really have to bear down on the pad of the brace to get the bit to cut, or if the bit still won’t cut at all, then the cutting lips have likely been filed incorrectly at some point in the past, and you will need to correct this problem in order to return the bit to working order. The problem is almost definitely the angle of the bottom of the cutting lips.
Just like a hand plane blade, the cutting lips of an auger bit need enough clearance behind the cutting edge to allow them to do their job. If there is insufficient clearance behind the cutting edge, the bevel of the cutting edge will rub the surface of the wood and the bit cannot cut correctly, no matter how much pressure is applied. On antique auger bits, improper filing of the cutting lips is probably the #1 reason that a bit doesn’t cut well.
As mentioned above, when sharpening the cutting lips of an auger bit, it is extremely important to file ONLY their top edges. Filing the bottom edge of the cutting lips, more often than not, results in reducing the clearance angle of the cutting edge, preventing the bit from cutting. This can be seen as a small secondary bevel on the bottom edge of the cutting lip.
If this has happened to the bit, the only way to fix it is to file the bottom of the cutting lip properly, removing the secondary bevel completely and restoring the bottom of the cutting edge to its original angle. Nine times out of ten, when someone asks me why their auger bit won’t cut, this is the problem. So if you are having problems with bits that won’t cut, check the bottom of the cutting lip carefully for a secondary bevel. I’d be willing to bet that it’s the problem with your bits as well.
Tag:Boring Tools, Sharpening

4 Comments
What do you do if an auger bit cuts well but doesn’t clean, i.e. all the chips get bound up in the first 2-3 turns of the spiral?
So I’m assuming you are not referring to the lead screw jamming up but the spiral of the shank itself. If the chips are not clearing up the spiral, it is likely because the spiral is dirty or rusty or gummed up. Your best bet is to clean the bit really well and make sure there’s no rust or sticky residue that is preventing the chips from traveling up the spiral. I use a soft wire wheel on a bench grinder, drill press or hand drill. Then, you can even polish the flutes with some very find sandpaper to make sure there’s no rough spots for the chips to catch in. A little wax on the spiral wouldn’t hurt either.
Dear Bob,
Thank you, this is about the best one of these I have found. I was really looking for some information on the correct ANGLES to file the edges to. I file quite a lot of auger bits for Tools for Self-Reliance (TFSR) where we refurbish old tools to send to places like Tanzania.
Right at the end of your article you mention the possibility of filing the bottoms of the cutters (or cutting lips). I do do this if I have to; sometimes quite a lot, to clean everything up or if there is an insufficient distance from the bottom tips of the spurs to the bottom of the cutters. I then always check the vertical distances from the tip of the lead screw to the cutting edges. They must be equal on each side.
Your point about the lead screw is very valid. They are a vital part. I often sharpen up the screw threads with a small triangular file or a small flat file; both of the ‘needle file’ size.
I don’t know what you do about cutter angles. I aim for about 70º or 80º from the vertical for the bottom cutter and about 30º included angle from the bottom to the top of the cutter blade; like a plane iron or chisel. I don’t measure each time; it’s now by experience and eye.
I use a brace to hold the auger bit that I am sharpening. The brace, in turn, is held in a plumbers pipe holding thing that has a ball-joint so I can turn the auger to any angle. This, in turn is held in a carpenter’s bench vice. It works well. (I know….but, whatever floats your boat. I do do it as part of my job.)
Best wishes, Luke Wiseman (in the U.K.)
Hi Luke,
Thanks for the comment! I use angles that are probably similar to what you describe, though I have never measured them. The goal is just to ensure that there is enough clearance for the cutters to engage and cut without being pushed out of the cut by the wood behind them. I aim for a minimum of 10 degrees of clearance, which would be your 80 degrees. But again, I’ve never measured it. Nice tip on using the brace and vice to hold the bit. That’s a good idea that I’ll have to try. Cheers!